Urban Light Rail Scale Models | Custom Transit System Models: A Detailed Production Guide
Case Study: Crafting Realistic Urban Light Rail Scale Models
This guide explores the process of creating detailed scale model kits, including sand table model and 3D printing model techniques, for realistic urban light rail systems. We follow a craft journey from initial concept to near-complete restoration, showcasing the creation of custom transit system models.
Materials Selection: Building a Solid Foundation for Scale Model Production
The success of any scale model or industrial model hinges on careful material selection. Here’s an overview of the primary materials used in crafting realistic transit system models:
- ABS Plastic Sheet: The primary material for constructing light rail car bodies, carriages, and structural components. It offers excellent workability (easy cutting), high strength, and a smooth surface ideal for shaping streamlined vehicle profiles.
- Transparent Acrylic Sheet: Essential for creating transparent parts like car windows and headlights, crucial for achieving realism in models like sand table model displays.
- Metal Alloy Wire: Used to construct metal structures such as tracks and overhead contact networks, adding authenticity to scale model and industrial model representations.
Auxiliary Materials:
- Environmentally Friendly Glue and Super Glue: Vital for joining components securely, ensuring the structural integrity of your scale model or industrial model.
- Acrylic Pigment and Spray Paint: Necessary for coloring and texturing, bringing the restored model (often a 3D printing model or handcrafted piece) to life with accurate colors and details.
Production Process: Assembling the “Building Blocks” for Custom Transit System Models
Building a detailed scale model or industrial model requires a systematic approach, often referred to as sand table model construction in miniature. This process involves creating modular components:
Vehicle Module Assembly
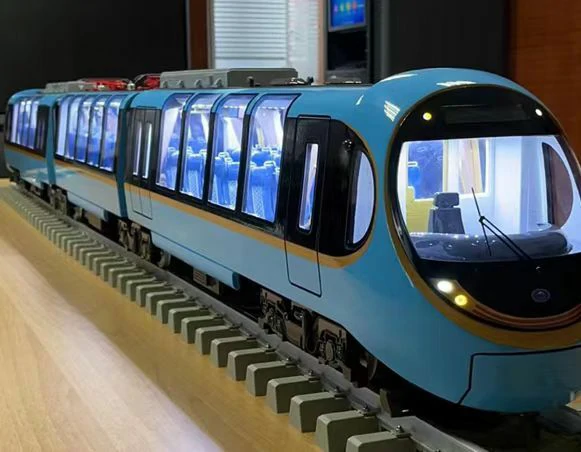
- Chassis/Carriage Body: Cut the desired shape for the light rail body using ABS plastic sheet. This forms the core structure upon which other parts are attached.
- Carriage Construction: Employ a “layered stacking” technique to create individual carriages (including sections like driver’s cabs and passenger compartments). This ensures consistent length and proportion across the entire train, essential for high-fidelity scale model production.
- Window Installation: Cut rectangular pieces from transparent acrylic sheet and adhere them to the sides of the carriages to simulate the glass effect seen in real light rail vehicles, a key detail for 3D printing model and handcrafted versions alike.
Detail Module Fabrication
- Accurate Miniatures: Create smaller components like headlights, door handles, and body markings using ABS plastic or metal alloy wire. These intricate parts are then precisely attached to the main body using a “plug-in + bonding” method, adding realism to your scale model or industrial model.
- Track Construction: Bend metal alloy wire into the characteristic U-shape of railway tracks. Securely attach these track sections to the model base to accurately represent the underlying railway infrastructure, crucial for sand table model presentations.
Post-Processing: Refining the Model for Photorealism
The final stages of scale model creation focus on color accuracy and surface texture enhancement:
Base Color Application
- Uniform Color Base: Spray the main car body color (typically white or light gray) using a “multiple spraying + drying” technique. This ensures a consistent, uniform base color free from drips or sags.
- Highlight Accents: Apply contrasting colors (like red or blue) to elements such as headlights, door edges, and handrails to match the real-world color scheme, enhancing the visual appeal of your 3D printing model or industrial model.
Color Scheme and Graphic Decoration
- Accurate Markings: Use fine acrylic paints or markers to meticulously replicate light rail logos, line numbers, and operational information on the vehicle sides. Clear, accurate graphics are vital for both scale model and industrial model authenticity.
- Window Frame Detailing: Mark a black border around the edges of the car windows using a fine pen. This simulates the frame surrounding the glass, adding an important finishing touch to models of all types.
Texture Optimization and Enhancement
- Headlight Refinement: Carefully attach a thin piece of transparent acrylic sheet over the front-facing headlights. This simulates a lampshade, improving the realism of the scale model or industrial model.
- Metallic Component Enhancement: Polish metal parts such as track sections and overhead contact systems (catenaries) and apply metallic paints. This “polishing + painting” process enhances their metallic texture and luster, crucial detail for sand table model displays and 3D printing model replicas.