optimized for SEO, Energy Storage Cabinet Models | Custom Scale Model Manufacturer
Case study on the production of proportion model for energy storage cabinet
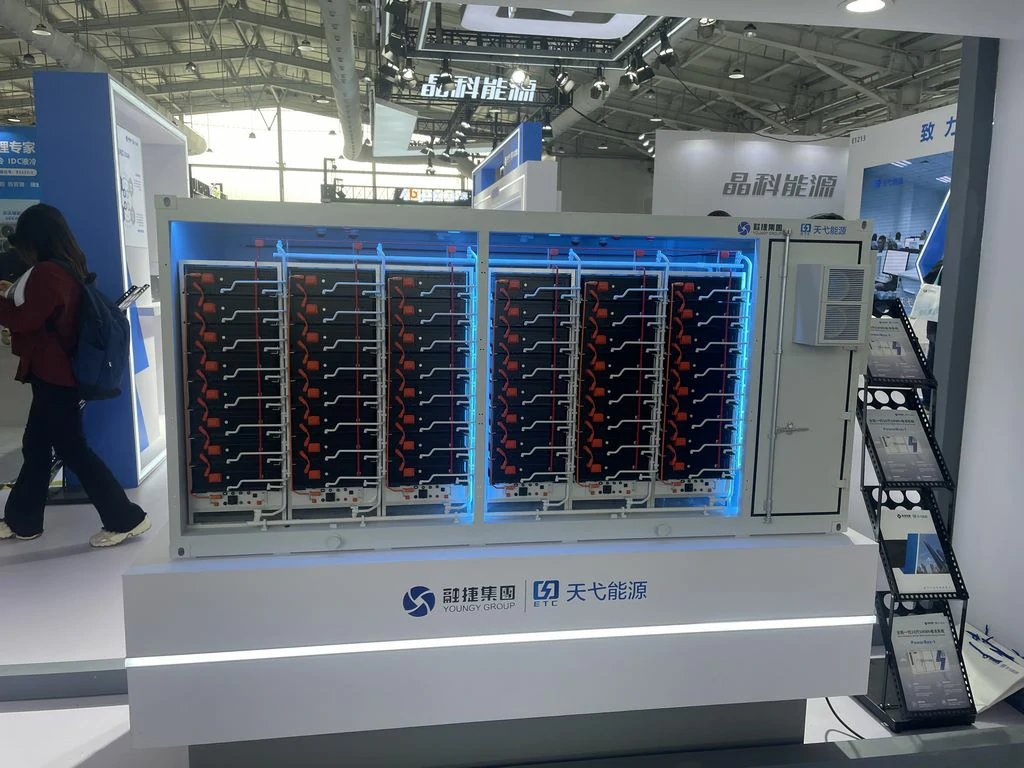
The aim of this project is to create a scale model of an energy storage cabinet, specifically a 1:10 scale sand table model, with a high degree of realism. This industrial model requires a highly realistic appearance, rich details, and authentic texture, aiming for a final restoration degree exceeding 90%. The entire production process does not involve internal electrical structures and focuses entirely on the simulation replication of the appearance.
1. Design and Material Preparation
The project team began by obtaining the complete set of exterior design drawings and high-definition photos of the original product. Based on the required scale model proportions, precise scaling calculations were performed, converting all exterior dimensions, door gaps, ventilation hole layouts, signage positions, and other details into machining drawings for the 3D printing model.
The selection of core materials was guided by the principles of “texture simulation” and “scale model ease of processing”:
- Main structural materials: Acrylic board and ABS engineering plastic board. Acrylic is ideal for large-area flat surfaces like cabinet side panels and top covers due to its high transparency and easy polishing, suitable for post-production observation. ABS board is used for door panels, frames, and various small structural components because of its excellent toughness and easy bonding properties.
- Detail accessories: Include ABS round and square rods (various diameters) for simulating pipes and cables, metal etching sheets for creating extremely fine ventilation grilles and brand logos, and high-precision 3D printing resin for manufacturing complex curved parts – such as fan covers, special handles, etc. – that cannot be easily achieved through sheet metal processing.
2. Core Manufacturing Process
Precision Cutting and Forming
All cutting of the main components was completed using laser cutting. This ensures absolute precision in all panel dimensions, smooth and burr-free edges and corners, and allows for the accurate cutting of all ventilation louver holes, door gaps, and installation holes in a single pass, significantly increasing efficiency and accuracy compared to manual labor. For parts requiring bending, such as specific sheet metal structures, a hot bending machine heats and shapes the ABS board to achieve neat, accurately angled folds.
Detail Carving and Addition
All text, warning signs, and parameter labels (with simulated content) on the model’s surface were directly printed using high-precision UV flatbed printing technology. This provides clarity comparable to real printed materials. For signs requiring a textured feel, shallow carving techniques were employed, followed by ink filling to replicate the true tactile sensation.
Assembly and Polishing
Specialized model glue and instant glue were used for bonding, ensuring firm and precise joints without glue overflow affecting aesthetics. Following assembly, the crucial polishing stage began. Using sandpaper from coarse to fine, all joint seams, cutting ports, and surface defects were meticulously polished one by one until the entire surface felt smooth and flat, and all joints were virtually invisible. This laid a perfect foundation for subsequent coloring.
3. Post Processing and Coloring
This is the most crucial step in endowing the scale model with its “soul” and achieving high scale model fidelity.
Primer Treatment
A gray model-specific primer was applied overall. This not only enhances the adhesion of the topcoat but also unifies the colors of all parts made from different materials, allowing for the exposure and final repair of any extremely subtle surface defects. It also forms a uniform frosted texture substrate.
Layered Spraying Topcoat
The paint was strictly mixed according to the original product color code and applied using a spray gun for multi-layer thin spraying. The base color was first applied and allowed to dry completely. Masking tape was then used to accurately cover different color areas, followed by spraying the second and third colors. This method ensures clear, sharp color boundaries, just like real industrial spray painting.
Aging and Texture Creation
To achieve the texture of real devices, a single solid color block was not used. Stain washing techniques were employed to infiltrate a small amount of dark oil-based paint into concave lines, rivets, and gaps, deepening shadows and enhancing a three-dimensional effect. Frequent touch points like door handles and corners received a slight dry sweep, and light-colored paint was used to simulate natural wear. Ventilation grilles and exhaust outlets were filtered with diluted black paint to simulate deep shadows and slight dust accumulation inside.
Final Assembly and Protection
After all paint surfaces were thoroughly dried, final assembly was performed, incorporating independently made glass observation windows (transparent acrylic), 3D printed fine handles, metal-etched logos, and other components. Finally, a layer of matte protective paint was applied overall to unify the glossiness of all components (common for industrial equipment) and protect the delicate paint surface from scratches and oxidation.
Through a series of rigorous processes and careful material selection, the final energy storage cabinet scale model is not only precise in external dimensions but also extremely close to the real product in terms of color, texture, details, and even visual weight. It has successfully achieved the production goal of more than 90% restoration, becoming a high-quality industrial model with significant display value.