optimized for SEO, incorporating the requested keywords naturally and professionally, while fixing any language issues and preserving the original formatting:
Custom Large Acrylic Historic Building Models: A Detailed Manufacturing Process
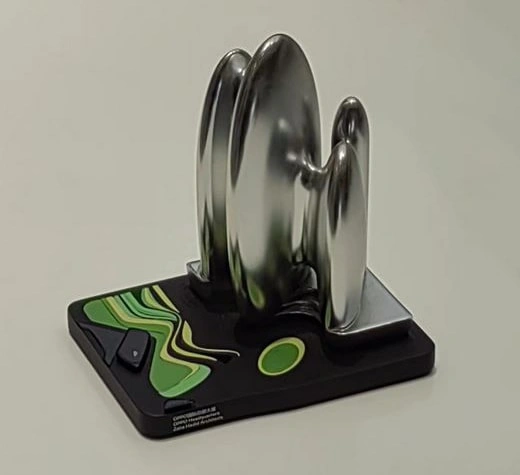
Our factory specializes in crafting intricate scale model replicas of historical Chinese architecture, utilizing advanced techniques to achieve high fidelity. The double-layer Chinese ancient architecture model presented here was meticulously constructed from 5mm thick new material acrylic board, scaled at a precise 1:30 ratio. This scale allows for the detailed representation of architectural features, including the characteristic upturned eaves and exquisite window frame carvings. Our commitment to authenticity is reflected in the 90% restoration rate achieved, accomplished through the integration of sand table model techniques like CNC precision cutting and skilled manual finishing. The main structure was broken down into 218 individual acrylic components, a process requiring 35 days to complete.
1. Material Screening and Drawing Analysis
The creation begins with rigorous material selection. We exclusively use brand new acrylic sheets boasting a transmittance of 92%, guaranteeing crystal-clear scale model transparency and freedom from impurities. Our technical team meticulously dissects original architectural CAD drawings, layer by layer at the 1:30 scale. Critical parameters, such as the specific scale model cornice rise angle (15°), the spacing dimension for the sand table model arch of wooden architecture (2.5cm), and the detailed scale model window lattice pattern (a combination of ice cracks and rhyming patterns), are identified and converted into precise laser cutting paths. Notably, the roof tile surface design incorporates pre-set 0.3mm wide tile seam marking lines in the drawing, serving as a guide for simulating the traditional stacking effect.

2. Main Structure Laser Cutting
The CNC laser engraving process is employed to cut the foundational elements—base, columns, beams, and roof components—sequentially from the acrylic sheets. To ensure clean cuts and prevent potential yellowing at the edges caused by high laser temperatures, a specialized “layered cutting method” is implemented: the surface protective film is first cut, followed by a cut to 2/3 of the 5mm board thickness using 300W laser power. The remaining 1/3 is manually snapped along the engraved line. Connection points, such as where columns meet crossbeams, are pre-cut with a mortise and tenon structure. The male and female joint dimensions are precisely set with the male being 0.1mm smaller for optimal glue fit. Post-cutting, pieces are meticulously inspected using powder-free gloves, and edges are smoothed with 2000 grit sandpaper. Critical right angle points are polished with a 0.5mm arc transition, enhancing both aesthetics and light refraction, crucial for a high-quality scale model. This meticulous attention prevents collisions and ensures superior surface quality.
3. Detail Carving and Hot Forming Treatment
The most complex aspects involve the arch of wooden architecture and the eaves. The intricate “Dou, Gong, and Ang” (bracket sets) are first outlined using laser carving, followed by meticulous tungsten steel cutter work guided by magnifying glasses. Each arch component often requires 12 distinct carving processes. Even the smallest decorative element, the “Shutou” (ornamental bracket top), standing just 1.2cm tall, features three layers of curved profiles. Eaves are fabricated using a “hot bending shaping process”: the cut acrylic eave sections are placed in a constant temperature (65°C) heating box for 10 minutes until pliable. They are then swiftly transferred to a custom wooden mold and secured with fixtures for 2 hours, cooling and shaping until the 15° lifting angle is achieved, with an error tolerance not exceeding 0.5°. Decorative elements like Wadang and Chuxiong are initially produced using 3D printing model techniques with photosensitive resin to create master molds. These are then transformed into silicone molds, into which liquid transparent acrylic is injected. After curing, these parts are carefully polished to match the transparency of the main acrylic body, ensuring visual consistency for the final scale model.
4. Splicing Assembly and Seamless Processing
Assembly takes place within a dust-free environment, guided by 1:1 positioning drawings. Acrylic components are secured using magnetic bases on the workbench. The process starts with column base and column installation, applying acrylic special glue precisely (a controlled 0.2ml along the mortise and tenon joints). Perpendicularity is checked and maintained within ±0.3mm using a square. Subsequent layers include the beam frame and the arch of wooden architecture, spliced layer by layer. 0.1mm thick transparent acrylic spacers are used to fine-tune the connection height between the arch and the beam, ensuring all arch components align perfectly on the same horizontal plane. During roof splicing, fluorescent adhesive is pre-applied along the pre-marked tile seam lines to reinforce structural integrity and mimic the shadow effect seen in traditional tile joints. Once assembly is complete, specialized acrylic polishing paste is applied to the splice interfaces. A two-stage process begins: rough grinding removes adhesive marks, followed by polishing with a wool wheel until the interface achieves a seamless, transparent finish, creating the desired scale model effect of appearing “integrated from afar and detailed up close.”
5. Transparency Verification and Finished Product Protection
The final assembly is placed within a custom-designed lighting box for comprehensive evaluation. From six directions, the uniformity of light transmission is checked, verifying that shadow deviations between elements like columns and beams are ≤ 1mm, and that window frame carvings maintain their integrity under backlighting. Following successful verification, the entire model undergoes a nanometer dust-proof coating application for long-term preservation. A protective acrylic display cover, cushioned with buffer cotton, is then fitted. An adjustable LED light band is embedded at the base and activated, bathing the model in light. This illumination reveals the unique “virtual reality” effect inherent to acrylic: the shadows cast by the cornices and arches create a complete, defined outline against the background, effectively reproducing the timeless charm of the ancient structure through transparent light and shadow – a hallmark of high-quality industrial model and architectural scale model craftsmanship.